Since the first 4K camcorder was launched by JVC last year, 4K videos have become the new direction of the shooting fields. HD has no longer satisfied people and here comes the 4K era. By the end of last year (2012), Sony launched two 4K camcorder PMW-F5/F55. And with them, a new recording format, XAVC, was born. This is a format that is encoding with MPEG-4 AVC/H.264 level 5.2, also the highest encoding level that is with the highest resolution and fastest frame rate due to the industrial standard. This format allows people to make not only the 4K movies, but also the 4K TV programs, documentaries, etc. Before long, Sony launched XAVC-S (MP4 format) to make this 4K format more accessible to people. With that, you can directly import XAVC-S to Mac for playback.
Though some software manufacturers claimed to support XAVC files with the latest version, but there still has exception. Apple iMovie would not or not that soon support XAVC. Thus, if you want to import XAVC files from your 4K camera to iMovie for editing, you can try to convert XAVC to Apple ProRes 422 MOV for iMovie rather than buy some new version editors that support XAVC files. As to the conversion, iOrgSoft XAVC Video Converter Mac can be the best choice for you to convert XAVC footages to Apple ProRes 422 MOV for iMovie and Final Cut Pro, or to Sony Vegas, Adobe Premiere, Avid, etc. Besides, you can also convert your XAVC to QuickTime MOV and other mobile devices like iPhone, iPad, Galaxy Note, Galaxy S, Sony Tablet Z, etc for smoothly playback.
But how to convert .xavc to .mov? With this video converter, you can make this process much easier with simple four steps. Below I will show you the specific usage with pictures and words:
Tip: if you are using Windows PC, you can use the Win version, just click here: iOrgSoft XAVC Video Converter.
Step 1. Download the free trial online
First you should download the converter with the download link above to have a try on this program. Then install and launch it for ready.
Step 2. Add XAVC files to XAVC Video Converter
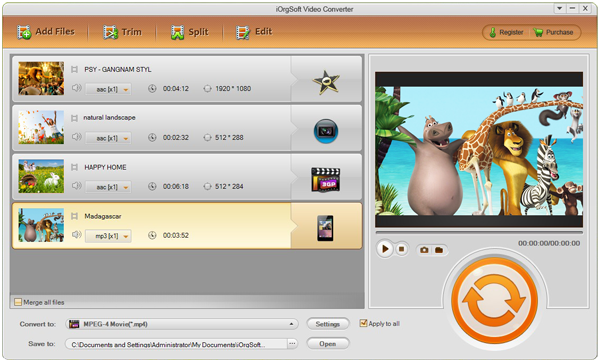
To import the files, you should click the “Add File” button on the top-left corner. Then you can choose the videos that you want to convert. Batch converting is allowed with this program, so you can convert all the selected files at a time.
Step 3. Set an output format
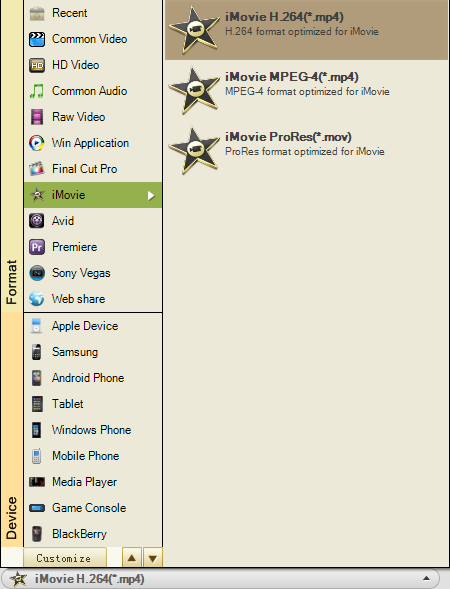
Here you may need to choose the iMovie ProRes as its output format. You can make it by hitting the “Convert to” bar and then choose “iMovie”-> “iMovie ProRes(*mov)”.
Step 4. Begin to convert XAVC to MOV
When all the parameters are ready, you can run the conversion by striking the “Convert” button, that is, the big round orange button on the right side. After the conversion, you can find out the processed files quickly by hitting the “Open” button besides the “Convert” button.


